
1. Enter master air waybill number in the Master Air Waybill Number field and

· Click ![]() to search an existing Master Air Waybill Number.
to search an existing Master Air Waybill Number.
· Click Use Stock to search an existing Master Air Waybill Number.
· Click Add e-CSD to create a new e-CSD. Click Add e-CSD to create a new e-CSD
· Click Link HAWB to link a House Waybill. Pop up screen will be displayed as shown below,
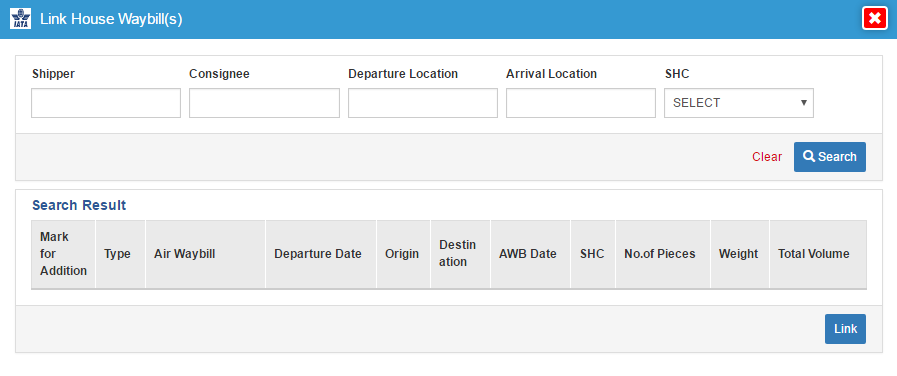
Follow the below steps to search and link House Waybill(s) to Master Air Waybill
o Click on ![]() to search for House Waybill(s). All the submitted House Waybills which are not linked will be listed in the Search Result section.
to search for House Waybill(s). All the submitted House Waybills which are not linked will be listed in the Search Result section.
o Search can also be performed by entering the required search parameters like Shipper, Consignee, Departure Location, Arrival Location and SHC.
o Below is a sample screenshot of the search results.
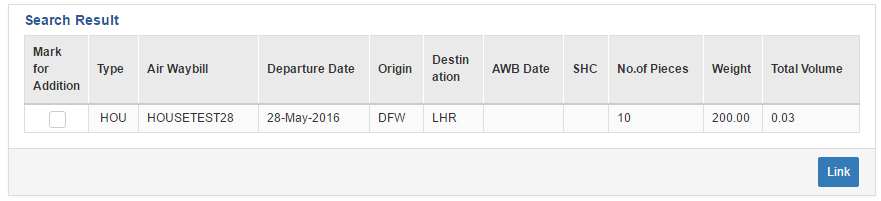
The search result displays the following fields,
|
Field |
Description |
|
Mark for Addition |
Checkbox for selecting the House Waybill for linking to MAWB |
|
Type |
Type of Document. |
|
House Waybill |
Denotes the House Waybill Number |
|
Departure Date |
Departure Date of Cargo |
|
Origin |
Origin from where the Cargo/Goods is being shipped |
|
Destination |
Destination where the Cargo/Goods is to be shipped |
|
AWB Date |
AWB created Date |
|
SHC |
Special Handling Code |
|
Piece |
No of items in the cargo |
|
Weight |
Total weight of the shipment |
|
Volume |
Total volume of cargo/goods being shipped |
o From the search results, select the House Waybill to be linked using the Mark for Addition check box and click on ![]() to link the selected House Waybill to MAWB
to link the selected House Waybill to MAWB
o Once the House WayBill is linked, the consignment details added in the House WayBill will be automatically displayed in the Master Air WayBill as shown in sample below
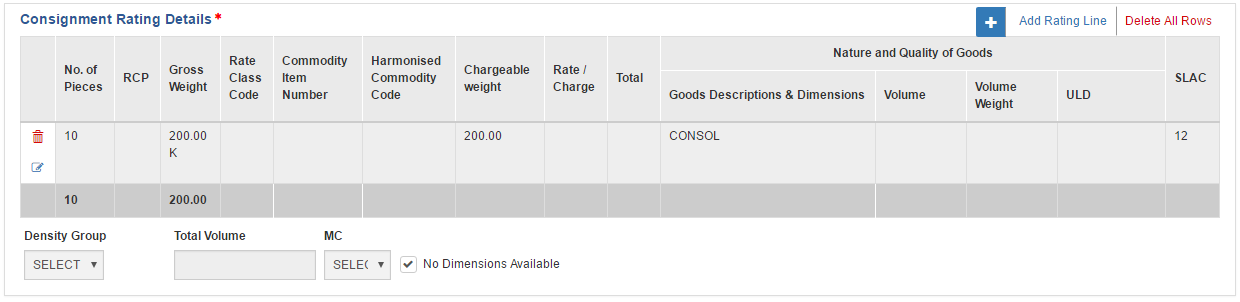
o Modification made in the linked House Waybill will be reflected in the Master Air Waybill.
o After adding a House WayBill to MAWB, if we click on Link HAWB button, the pop-up screen will display the linked House WayBill.
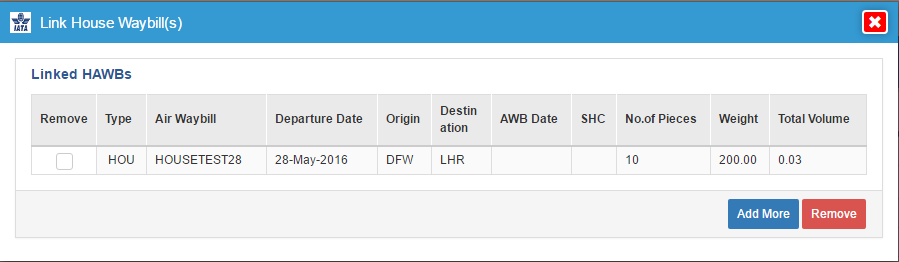
o Remove button can be used to remove any linked House Waybill and Add More button can be used to link more House Waybill
2. If you need to use your existing AWB template, then under Template, select the required template and click Load Template.
![]()
Note: If you are using template for creating Master Air Waybills, first load the template before you assign an AWB Number and Link the HAWB’s, otherwise you will lose the entered information and HAWB Number.
3. Under the Shipper’s Name and Address field: This is a mandatory field.
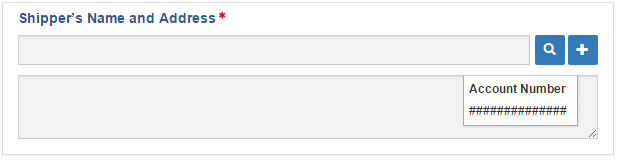
Note: Infromation entered/added in the Also Notify/Consignee will also be displayed in the “Shipper” search results and vice versa.
· Click ![]() to search an existing shipper's name and address. Results matching the text entered in text field will be listed, select a record from the results.
to search an existing shipper's name and address. Results matching the text entered in text field will be listed, select a record from the results.
(Or)
· Click ![]() to add a new shipper’s name and address.
to add a new shipper’s name and address.
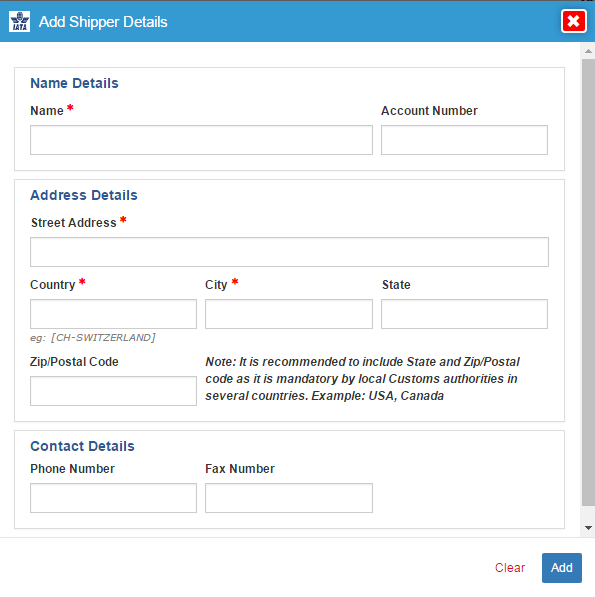
o Under Name details, enter Name(Mandatory field) and Account Number of the shipper
o Under Address Details, enter street Address (Mandatory Field), Country(Mandatory Field), City (Mandatory Field), State and Zip/Postal code of the shipper.
o Under Contact Details, enter Phone Number and Fax Number of the shipper
4. Under the Issuing Carrier's Name and Address field: This is a mandatory field.
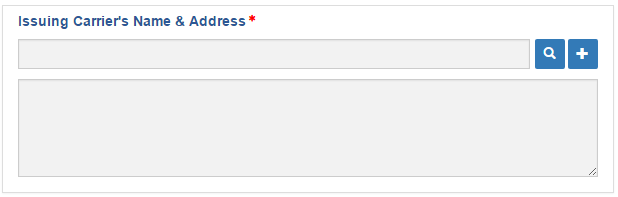
· Based on Airline code in the Master Air WayBill number, Name and Address of the Airline will be automatically populated in this field
· Enter some text in the text field and click ![]() to search an existing issuing carrier's name and address. Results matching the text will be displayed. Select the required one.
to search an existing issuing carrier's name and address. Results matching the text will be displayed. Select the required one.
OR
· Click ![]() to add a new issuing carrier's name and address.
to add a new issuing carrier's name and address.
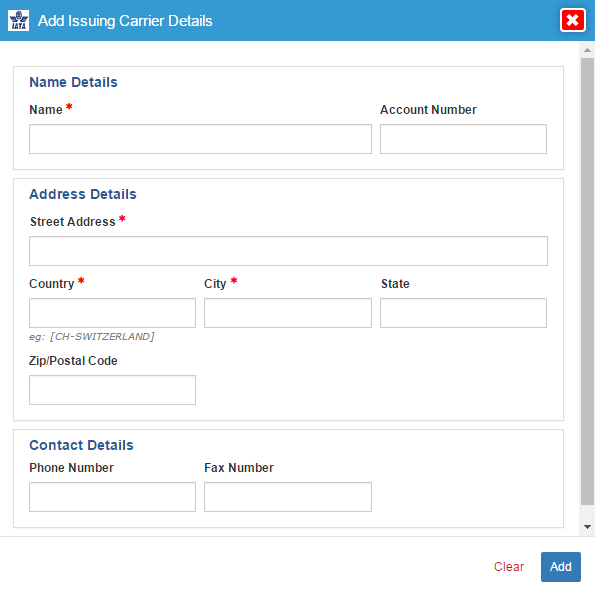
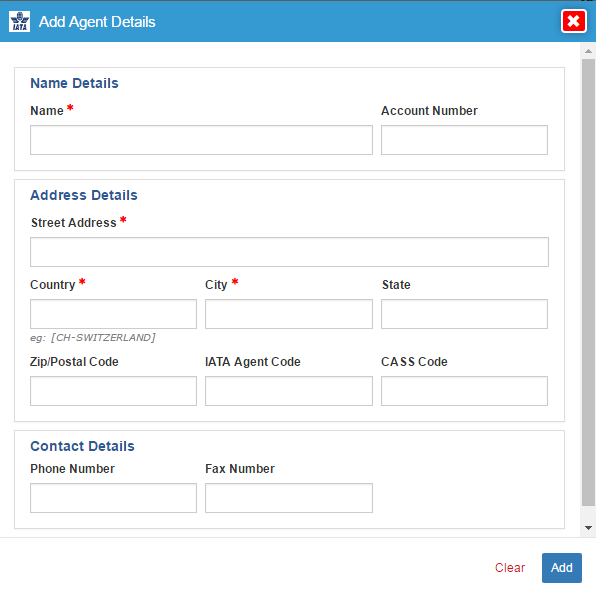
o Under Name Details, enter the Name (Mandatory Field) and Account Number of the agent to be added
o Under Address Details, enter Street Address (Mandatory Field), Country(Mandatory Field), City(Mandatory Field), State,Zip/Postal Code, IATA Agent Code and CASS code of the Agent to be added.
o Under Contact Details, enter Phone Number and Fax Number of the Agent to be added
5. Under the Consignee’s Name and Address field: This is a mandatory field.
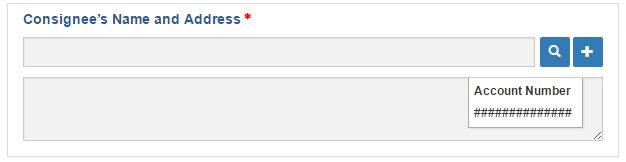
Note: Infromation entered/added in the Also Notify/Shipper will also be displayed in the “Consignee” search results and vice versa.
· Click ![]() to search an existing consignee’s name and address. Results matching the text will be displayed. Select the required one.
to search an existing consignee’s name and address. Results matching the text will be displayed. Select the required one.
OR
· Click ![]() to add a new consignee’s name and address.
to add a new consignee’s name and address.
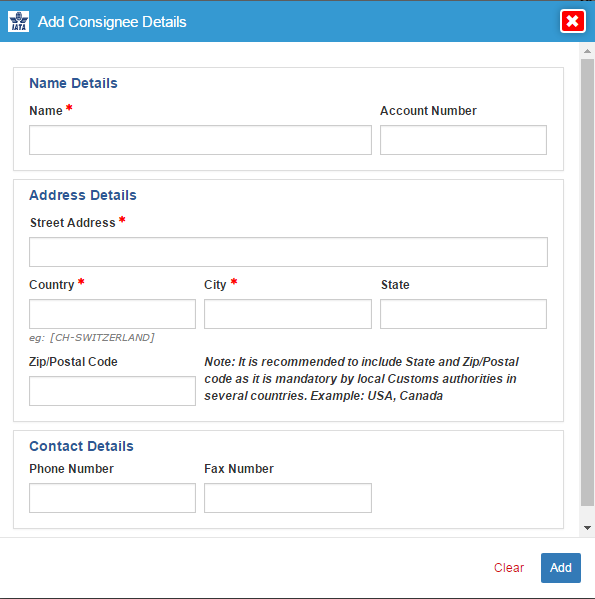
o Under Name Details, enter Name (Mandatory Field) and Account Number of the consignee to be added
o Under Address Details Field, enter Street Address (Mandatory Field), Country (Mandatory Field), City (Mandatory Field), State and Zip/Postal Code of the consignee to be added
o Under Contact Details, enter Phone Number and Fax Number
6. Under Accounting Information:
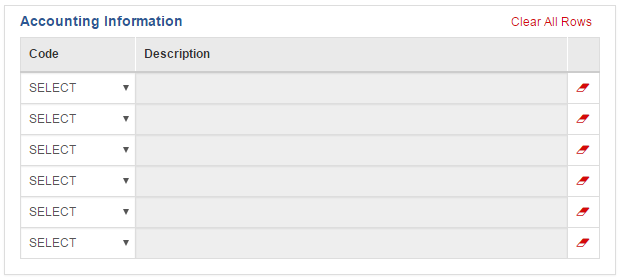
· Select the required code from the Code field.
· Enter the description in the Description field.
· You can click ![]() icon to clear the details selected or entered. Click Clear All Rows to clear multiple rows together.
icon to clear the details selected or entered. Click Clear All Rows to clear multiple rows together.
7. Under the Issuing Carrier's Agent Name and City:
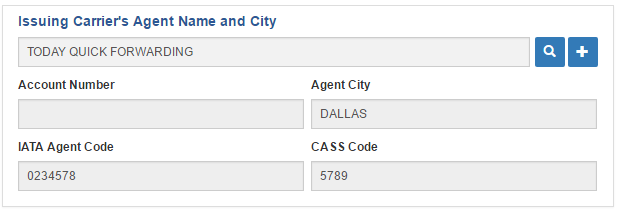
· Details of the logged in Agent will be automatically populated in this field.
· Click ![]() to search an existing issuing carrier's agent details, and select the required one.
to search an existing issuing carrier's agent details, and select the required one.
· On selecting the existing issuing carrier's agent, corresponding details such as account number, agent city, IATA agent code, and CASS code are displayed. This will be a transactional information and by default the logged in agent will be displayed.
(Or)
· Click ![]() to add a new issuing carrier's agent details.
to add a new issuing carrier's agent details.
o Under Name Details, enter the Name (Mandatory Field) and Account Number of the agent to be added.
o Under Address Details, enter Street Address (Mandatory Field), Country(Mandatory Field), City(Mandatory Field), State,Zip/Postal Code, IATA Agent Code and CASS code of the Agent to be added.
o Under Contact Details, enter Phone Number and Fax Number of the Agent to be added.
8. Under Shipping Information:
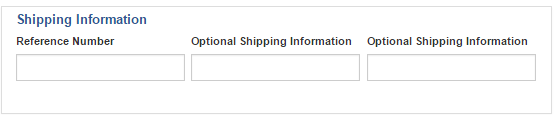
· Enter the reference number in the Reference Number field.
· Enter the optional shipping information in the Optional Shipping Information field.
· Enter the optional shipping information in the next Optional Shipping Information field in case the first text exceeds the limit of the first optional shipping information field.
9. Under Requested Routing:
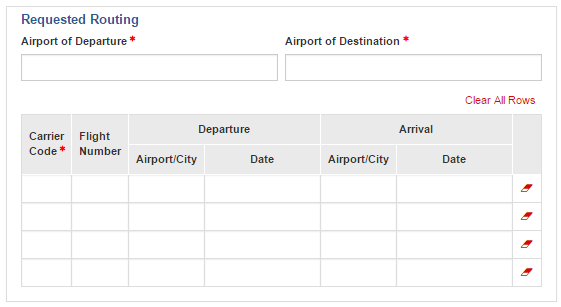
· Enter the airport of departure in the Airport of Departure field. This is a mandatory field.
· Enter the airport of destination in the Airport of Destination field. This is a mandatory field.
· You can click Clear All Rows to clear the entered details multiple rows together.
· Based on the Airline code in the Air Waybill number, carrier code will be automatically populated in the Carrier Code field. To change the carrier code, remove the auto-populated value and enter carrier code here. This is a mandatory field.
· Enter the flight number in the Flight Number field.
· Enter the airport in the Airport field under Departure.
· Select the appropriate date from the Date field under Departure.
· Enter the airport in the Airport field under Arrival.
· Select the appropriate date from the Date field under Arrival.
· You can click ![]() icon to clear the details selected or entered. Click Clear All Rows to clear multiple rows together.
icon to clear the details selected or entered. Click Clear All Rows to clear multiple rows together.
10. Under Charges Information:
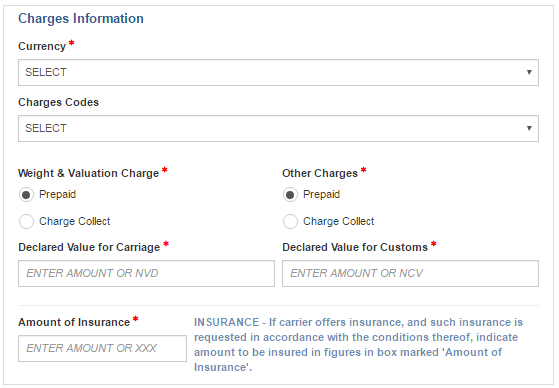
· Based on the Airport of Departure, currency will be automatically selected in the Currency field. In order to change, select the appropriate currency from the dropdown list. This is a mandatory field. For Mexico country the currency will be defaulted to USD.
· Select the appropriate charges code from the Charges Codes field.
· Select Prepaid or Charge Collect as appropriate from the Weight & Valuation Charge field. Prepaid will be selected by default. This is a mandatory field.
· Select Prepaid or Charge Collect as appropriate from the Other Charges field. Prepaid will be selected by default. This is a mandatory field.
· Enter the appropriate amount in the Declared Value for Carriage field. This is a mandatory field.
· Enter the appropriate amount in the Declared Value for Customs field. This is a mandatory field.
· Enter the appropriate amount in the Amount of Insurance field. This is a mandatory field.
11. Under the Also Notify field:
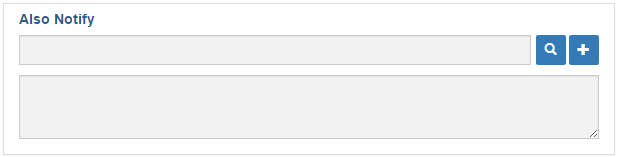
Note: Infromation entered/added in the Consignee/Shipper will also be displayed in the “Also Notify” search results and vice versa.
· Enter some text in text field and click ![]() to search an existing also notify record. Results matching the text will be displayed. Select the required one.
to search an existing also notify record. Results matching the text will be displayed. Select the required one.
OR
· Click ![]() to add a new ‘also notify’ record.
to add a new ‘also notify’ record.

o Under Name details, enter Name (Mandatory field) and Account Number of the shipper.
o Under Address Details, enter street Address(Mandatory Field), Country (Mandatory Field), City (Mandatory Field), State and Zip/Postal code of the shipper.
o Under Contact Details, enter Phone Number and Fax Number of the shipper..
12. Under Handling Information:
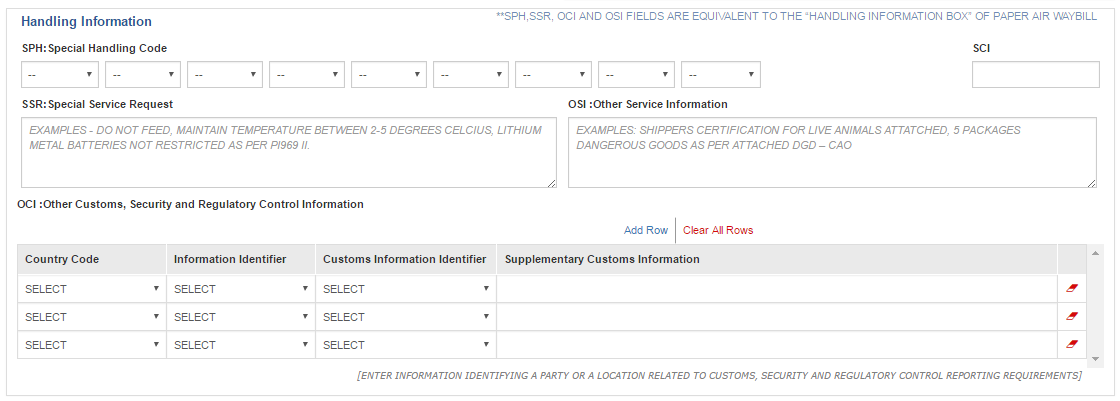
· Select the appropriate SPH codes from the SPH: Special Handling Code field. Maximum of 9 codes can be selected in a Master Air Waybill.
· Enter the appropriate SCI in the SCI field. When Airport of Departure or transit is a European country, this field becomes mandatory.
· Enter the appropriate service request in the SSR: Special Service Request field.
· Enter the other service information in the OSI: Other Service Information field.
· Under OCI: Other Customs, Security and Regulatory Control Information
o You can click Add Row to add more rows. OR you can click Clear All Rows to clear the details entered in the rows.
o Select the appropriate country code from the Country Code field.
o Select the appropriate information identifier from the Information Identifier field.
o Select the appropriate customs information identifier from the Customs Information Identifier field.
o Enter the supplementary customs information in the Supplementary Customs Information field.
o Click ![]() icon to clear the details entered in the corresponding column.
icon to clear the details entered in the corresponding column.
13.
14. Under the Consignment Rating Details: This is a mandatory field.

· The Consignment Rating Details section displays the number of pieces, RCP, gross weight, rate class code, commodity item number, harmonised commodity code, chargeable weight, rate/charge total, goods descriptions & dimensions, volume, volume weight, ULD and SLAC.
· Click ![]() or Add Rating Line to add a new consignment rating details. Popup screen will appear as shown below.
or Add Rating Line to add a new consignment rating details. Popup screen will appear as shown below.

Below are the steps for adding a consignment rating details:
o Either No. of Pieces or RCP can be added to consignment rating details at once. When value is entered in No. of Pieces text field, RCP text field will be disabled and when RCP is entered with some value, No. of Pieces will be disabled.
o Enter SLAC in SLAC field.
o Select Rate Class Code from the dropdown list. Based on the Rate class code selection below changes will occur.
|
Rate Class Code |
Changes |
|
B – Basic Charge |
Total Amount Field will be enabled |
|
C – Specific Commodity Rate |
Total Amount Field will be disabled |
|
E – ULD Additional Rate |
Total Amount Field will be disabled |
|
K – Rate Per Kilogram |
Total Amount Field will be disabled |
|
M – Minimum Charge |
Total Amount Field will be enabled |
|
N – Normal Rate |
Total Amount Field will be disabled |
|
P –International Priority Service Rate |
Total Amount Field will be disabled |
|
Q – Quantity Rate |
Total Amount Field will be disabled |
|
R – Class Rate Reduction |
Total Amount Field will be enabled |
|
S – Class Rate Surcharge |
Total Amount Field will be enabled |
|
U – ULD Basic Charge or Rate |
No. of PCs and Rate/Charge field will become mandatory fields |
|
X – ULD Additional Information |
Total Amount Field will be disabled |
|
Y – ULD Discount |
Total Amount Field will be enabled |
o Specify the Rate Class Percentage in Rate Class Percentage field. When a value is entered in this field, Commodity Item Number and ULD Rate Class Type fields will be disabled.
o Enter Commodity Item Number in Commodity Item Number field. When a value is entered in this field, Rate Class Percentage and ULD Rate Class Type fields will be disabled.
o Enter value in Gross Weight field, Chargeable Weight field will be automatically filled with the same value and Chargeable Weight & KG/LB will become mandatory.
i. When the Gross weight is entered with decimal values the system will round of the chargeable weight to the next higher fraction. E.g. Gross amount is entered as 153.34 then the chargeable weight will be displayed as 153.50 and when the Gross weight is entered as 153.60 then chargeable weight will be displayed as 154.00.
o Select a value in KG/LB field next to Gross Weight field, Gross Weight field will be changed to mandatory.
o Volumetric Weight is auto-calculated based on the selection of values in KG/LB, Length, Width, Height, CM/IN and No. of Units field (all the fields should be selected with values).
vii. When KG/LB is selected as K and CM/IN is selected as CM,
Volumetric Weight = (length * width * height * no. of units)/6000
viii. When KG/L is selected as K and CM/IN is selected as IN,
Volumetric Weight = (length * width * height * no. of units)/366
ix. When KG/L is selected as L and CM/IN is selected as IN,
Volumetric Weight = (length * width * height * no. of units)/166
o Enter a value in Chargeable Weight field, KG/LB field will be changed to mandatory. Chargeable weight field will be automatically filled with values when some value is entered in Gross Weight field or Volumetric Weight field.
i. System will display the Chargeable weight same as Gross or Volumetric weight whichever is higher.
o Select a value in KG/LB field next to Chargeable Weight field, Chargeable Weight field will be changed to mandatory.
o Enter value Rate/Charge field, Total Amount will be auto calculated based on Chargeable Weight & Rate/Charge field as,
i. When Rate Class Code is C-Specific Commodity Rate, K- Rate per Kilogram, N-Normal Rate, P-International Priority Service Rate, Q-Quantity Rate, R-Class Rate Reduction, S-Class Rate Surcharge, E- ULD Additional Rate and X-ULD Additional Information.
Total Amount = Chargeable Weight * Rate/Charge
ii. When Rate Class Code is U-ULD Basic Charge or Rate
Total Amount = No. of Pieces * Rate/Charge
iii. When Rate Class Code is B-Basic Charge or M-Minimum Charge,
Total Amount = Rate/Charge
iv. When Rate Class Code is Y-ULD discount, Goods Description will be auto-filled as “DISCOUNT” and value entered in Rate/Charge will be negative, thus resulting in a negative Total Amount.
Total Amount = Chargeable Weight * (- Rate/Charge)
o Total Volume field will be updated with sum of the volume available in the rating line.
o Enter description in Goods Description field.
o Enter length, width, height, cm/in and number of units in Length, Width, Height, and CM/IN & No. Of Units field respectively. If any field is filled with values, other fields will be changed into a mandatory field and Volume & MC field will be disabled.
o Enter value in Volume field, MC field will be auto-selected as MC and Length, Width, Height, CM/IN & No. Of Units fields will be disabled.
o Enter ULD type in ULD Type field
o Enter ULD serial number in ULD Serial Number field.
o Enter ULD owner code in ULD Owner Code field.
o Enter ULD Rate Class Type. This field will be disabled based on whether values are entered in Rate Class Percentage or Commodity Item Number field.
o Enter harmonized commodity code in Harmonised Commodity Code field.
o Click on Add.
· Click Delete All Rows to clear multiple rows together.
· Click ![]() to delete the row.
to delete the row.
· Click ![]() to edit the details.
to edit the details.
· Select the appropriate density group from the Density Group field.
· Total Volume field will be updated with sum of the volume available in the rating line.
· The system will default to MC in the MC field.
· No Dimensions Available option will be checked if the dimensions are not added in the consignment rating detail or no volume in available.
15. Under Other Charges:
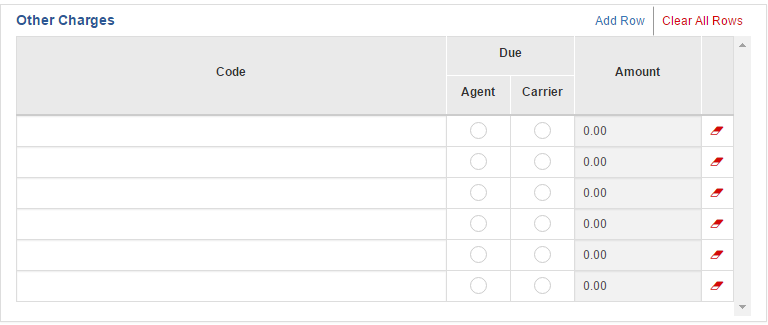
· You can click Add Row to add more rows.
· Select the appropriate code from the Code field.
· Select other charges accrual as either Due at Agent or Carrier.
· Enter the appropriate amount in the Amount field.
· Click ![]() icon to clear the details entered in the corresponding row.
icon to clear the details entered in the corresponding row.
· You can click Clear All Rows to clear the details entered in the rows.
16. Charge Summary:

The Charge Summary section displays the weight, charge, valuation charge, tax, total other charges due agent, total other charges due carrier, total prepaid, and total collect values.
17. Under Shipper Certification:
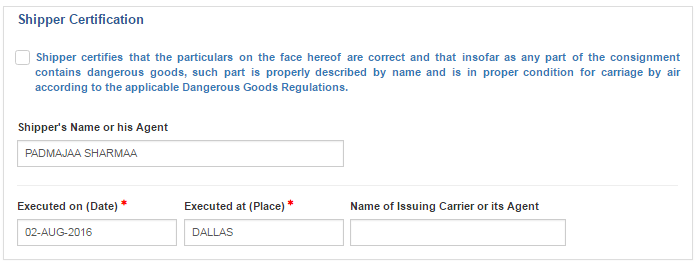
· Check the shipper’s certification checkbox.
· Logged in Agent’s name will be automatically displayed in Shipper's Name or his Agent field. This can be modified.
· By default, created date will be displayed in the Executed on (Date) field. This value can be changed. This is a mandatory field.
· Logged in user’s city will be displayed in Executed at (Place) field. The value can be changed. This is a mandatory field.
· Issuing carrier name is displayed as default or enter the appropriate issuing carrier’s or its agent’s name in the Name of Issuing Carrier or its Agent field.
18. Under Charges Collect Summary:
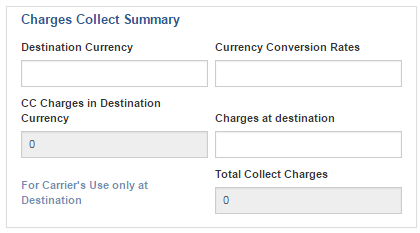
· Destination Currency will be auto-populated based on the Airport of Departure.
· Enter the appropriate currency conversion rate in the Currency Conversion Rates field.
· The appropriate CC charges in destination currency is displayed in the CC Charges in Destination Currency field.
· Enter the appropriate charges at destination currency in the Charges at destination field.
· The total collect charges are displayed in the Total Collect Charges field.
19. Click Preview to preview the current record.
20. Click Save as Template to save the current record as a template.
21. Click Validate to validate all fields.
22. Click Save to save the current record.
23. Click Submit to submit the current record.